

Submit your measurements
✦ How to Take Your Measurements
To create a beautifully tailored piece just for you, Dalynnja Le Clerq Couture needs your precise body measurements. This step is essential in ensuring the garment fits you like a dream—elegant, comfortable, and truly yours.
✦ Before You Begin
For the most accurate results, take your measurements while wearing only your underwear or the undergarments you plan to wear with the piece. Avoid measuring over clothes, as that can add bulk and distort your true shape.
The measuring tape should sit snugly around your body, not too tight and not too loose—just a natural fit that follows your silhouette.
You’ll find photo guides and clear descriptions attached to help walk you through each step of the process. These are here to make sure you feel confident and supported as you measure.
✦ What You’ll Need
-
A soft measuring tape (the kind used for sewing)
-
A friend, partner, or family member to help—because measuring yourself can be tricky!
✦ Helpful Tips & Tricks
-
The undergarments you wear can change your measurements significantly—especially padded bras, shapewear, or corsets. Always measure over the underlayers you plan to wear most often.
-
To find your natural waist, try tying a ribbon or piece of elastic around your waist and letting it settle—this will show you exactly where to measure.
-
Don’t worry if your numbers don’t look “perfect”—bodies are wonderfully unique. But if anything seems very unusual or inconsistent, I may reach out personally just to double-check and ensure everything is correct before I begin drafting your pattern.
✦ A Gentle Reminder
Please take your time with this process. Since every garment is handmade to order based on the measurements you provide, Dalynnja Le Clerq Couture cannot be held responsible for incorrect measurements.
If you're unsure about anything—or just want a bit of guidance—feel free to reach out at info@dlccouture.com. I’m always happy to help.
✦ (1) Bust
Wrap the measuring tape around the fullest part of your bust, making sure it stays level across your back and front. Measure over your bra, ideally the one you plan to wear with your garment. The tape should be snug but not tight—comfortably resting against your skin.
✦ (2) Waist
Find your natural waistline, which is usually the narrowest part of your torso—just above your belly button. It may help to tie a ribbon or elastic around your waist and let it settle naturally to guide you. Hold the tape straight and level, and breathe normally while measuring—don’t suck in or hold your breath.
✦ (3) Hips
Stand with your feet together and measure around the widest part of your hips and buttocks. This point is typically 15 to 25 cm below your waist, depending on your body. Ensure the tape lies flat and straight, circling around the fullest area without digging in.


✦ (4) Front Width
Measure across the upper chest, just above the bust and below the armpits, from one side to the other. Keep your shoulders relaxed and stand tall with your arms resting naturally at your sides. The tape should be flat and straight across the front of your body.
✦ (5) Bust Width
Measure horizontally across the bust, from nipple to nipple. This gives a sense of the spacing and shape of the bust area, which is important for patterning vintage-style garments with precision.
✦ (6) Front Length
Begin at the base of your neck, right at the small bony lump (your clavicle notch), and measure straight down the center of your torso to your natural waistline. Keep the tape vertical and your posture upright.
✦ (7) Back Width
Starting 15 cm below the base of your neck measure horizontally across your upper back. Go from the point where one arm naturally meets the body to the same point on the opposite side. Let your arms hang naturally at your sides during this measurement—raising or tensing them can distort the result.
✦ (8) Back Length
Measure from the base of your neck (neck bone) straight down the center of your back to your natural waistline.
✦ (9) Side Length
Start at the bottom of your armpit and measure vertically down to your natural waistline. Keep the tape close to your body and maintain a straight posture for the most accurate result.


✦ (10) Neck Circumference
Wrap the tape around the base of your neck, where a collar would naturally sit. The tape should be snug but not tight—you should still be able to breathe and move comfortably. For ease, allow just a bit of room (you can place one finger between the tape and your neck as a guide).
✦ (11) Shoulder Width
Measure from the base of your neck (where it meets your shoulder) to the point where your shoulder ends and the arm begins to slope down. Keep the tape straight and follow the natural curve of your shoulder.
✦ (12) Bust Height
Measure vertically from the top of your shoulder (next to your neck) down to the apex of your bust (nipple). Stand tall and relaxed for an accurate reading.
✦ (13) Hip Height
Measure vertically from your natural waistline to the fullest part of your hips. This helps determine the vertical placement of the hip curve in your garment.
✦ (14) Side Length
Start at your natural waistline and measure down the side of your body to the floor. Stand barefoot or in the shoes you plan to wear with the garment to get the most accurate length.
✦ (15) Knee Circumference
Wrap the measuring tape around your knee, keeping it comfortably loose. To avoid too tight a fit, place two fingers between the tape and your leg as you measure.
✦ (16) Ankle Circumference
Measure around your ankle, making sure the tape isn’t pulled tight. The tape should rest softly against your skin for a comfortable, accurate measurement.
✦ (17) Inseam
Measure from the top of your inner thigh (crotch) straight down to the floor. Stand tall with your legs straight, and it’s best to have someone assist with this measurement for accuracy.
✦ (18) Arm Length to Elbow
With your arm slightly bent, measure from the top of your shoulder (where the arm begins) down to your elbow. This helps create a perfectly tailored sleeve that allows for natural movement.
✦ (19) Arm Length to Wrist
Again, with your arm gently bent, measure from the shoulder seam all the way down to your wrist bone. Stand relaxed and allow your arm to follow its natural curve for the most accurate fit.
✦ (20) Upper Arm Circumference
Wrap the measuring tape around the fullest part of your upper arm, typically midway between the shoulder and elbow. Keep your arm relaxed by your side while measuring—this ensures a comfortable fit, especially for vintage-style sleeves.
✦ (21) Elbow Circumference
Measure around your elbow joint while your arm is slightly bent. The tape should rest gently around the curve of your elbow without pulling tight.
✦ (22) Wrist Circumference
Wrap the tape around your wrist, just above the wrist bone. Leave a little room for ease—just enough for a fingertip to slide under the tape is ideal.
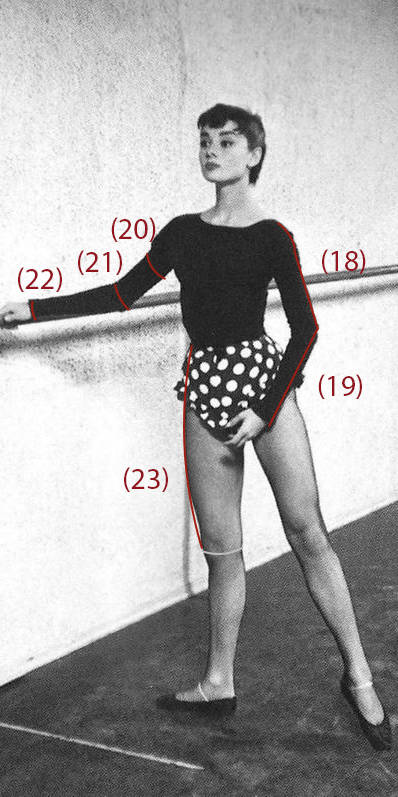
✦ (23) Knee Height
Measure vertically from your natural waistline down to your knee. Standing straight, this measurement helps determine correct proportions for skirts, dresses, or trousers with vintage silhouettes.

✦ (24) Sitting Height
Sit upright on a chair or stool with your feet flat on the floor and your back straight. Measure vertically from your natural waistline down to the seat of the chair or stool. This measurement helps determine how garments will sit and drape when you’re seated—especially important for pieces with structured waists and trousers.